Friday, September 25, 2009

Shimmery Rose


I kept seeing a ton of cards using this new technique with Shimmery White cardstock and reinkers and had to make one for myself. Patty Bennett (an awesome Stampin' Up demonstrator!!) made this fabulous tutorial explaining how to do it so I won't bore you with my step by step details except to say I only used one color reinker just to see what it would look like.

I also want to say that the photo does not do this card justice. It is very vibrant with a sheen of shimmer all over the rose that no matter how many photos I took I could not capture it. It is very easy to do and packs a big WOW. I know a lot of people are hesitant to bust into a package of Shimmery White cardstock because there are only 10 sheets per package but this is the perfect time to tear off that plastic and have some fun!

My color combination was inspired by a shirt that I bought earlier in the summer and is navy and has a few small touches of hot pink. Night of Navy and Melon Mambo were perfect matches. I'm not much into wearing pink but for some reason I like it on this one shirt and felt it would make a good color combination for a card.

Stamps: Fifth Avenue Floral, Fundamental Phrases

Ink: white craft, Melon Mambo (reinker), Night of Navy

Cardstock: Night of Navy, Melon Mambo, Shimmery White

Accessories: clear embossing powder, aquapainter, small & large oval punches, organza ribbon, dimensionals

Monday, September 21, 2009

Bold Bright Baby Shower Invitation


Here is a project that I've been busy with the last few weeks; designing, re-designing, cutting, assembling and finally mailing. This is a baby shower invitation that I designed for our very good friends who are expecting their first child in November. I wanted to use the colors of the nursery to get me started and the mommy-to-be gave the OK to use the giraffe from Wild About You (it's retired but I still reach for it all the time!). Polka Dots are also part of the nursery decor so of course I had to get those in somewhere!

The only problem I encountered when designing these cards was that all 3 colors are so bright that using too much of one would totally overwhelm the card. I had to play around a bit to make sure there was enough white space to balance out the colors. For the polka dots I used the awesome 12x12 textured cardstock and my trusty circle punches. I liked the look of the textured cardstock as it gave some added interest and depth to contrast with the Whisper White base. I made close to 40 invitations and didn't even use up a whole sheet of 12X12 for each color....that's a lot of circles but the cardstock goes a long way when you're using it for smaller elements. And finally the giraffe panel is popped up on dimensionals.

Stamps: Wild About You, Something to Celebrate (sentiment)

Ink: Only Orange, YoYo Yellow, Tempting Turquoise

Paper: Whisper White, Tempting Turquoise, Textured cardstock- Yoyo Yellow, Only Orange, Tempting Turquoise

Accessories: 3/4", 1" & 11/4" circle punches, dimensionals

Friday, September 18, 2009

Masculine Pine


Here is another card inspired by a challenge on Splitcoaststampers. Lately it seems that I need to have something to start me off for a project. I like checking out the challenges and then mull them over for a day or 2 and try to build a card in my mind so that when I do have time to get in my stamp room I've at least narrowed some of my choices down and I can get started right away instead of making several false starts. So for this card I used Sketch Challenge 245 to begin.

This is a pretty straightforward card even with all the layers. The bottom layer is the retired Manchester DSP (which I will get through someday!). The kraft layer is stamped with the Sanded background in Versamark, edges distressed and copper brads added in the corners. The next little layer is a strip of Mellow Moss, also distressed with a line of paper piercing down the middle. For the tree layer I stamped the pine tree from the SO versatile set Lovely As A Tree with Versamark and then used my pastels and a cotton ball to pounce some Always Artichoke color on the tree (this technique is called Poppin' Pastels). This gives it a very soft look which would look great on a Christmas card as well. I used the ticket corner punch on the corners and popped this layer on dimensionals.

Stamps: Lovely As A Tree, Sanded

Ink: Versamark

Paper: Manchester DSP, kraft, Mellow Moss, Always Artichoke, Very Vanilla

Accessories: distressing tool, copper brads, paper piercer, ticket corner punch, pastels, dimensionals

Thursday, September 17, 2009

Fifth Avenue Floral Watercolor


For this card I was inspired by last week's color challenge over on Splitcoaststampers. It was to use Black, Elegant Eggplant & Old Olive. I also needed a birthday card so I thought I would try to combine the challenge and my specific need for a card.

First I started with some watercolor paper and Stazon black ink (so I could watercolor without my image smearing). I stamped the middle flower first and then covered it with my mask made from a sticky note then I stamped the other 2 flowers. I used my aquapainter and Elegant Eggplant ink pad (Hint: you can squeeze your inkpad to get a bit of ink on the inside of the lid to watercolor with or if you only have a Stampin' Spot in the color you want just stamp the spot directly on the lid of your stamp set case and pick up the ink that way- then just wipe off when you're finished). Some Old Olive ink colored on the flower centers and to jazz it up a little some Dazzling Diamonds on the center flower.

I wanted to keep the sentiment clean so I just did the single word "Celebrate" punched with the oval punch and layered on the scallop oval. Pop that on top of a small strip of leftover Kiwi Kiss satin ribbon (because it's a pretty good match to Old Olive) and it's all finished.

Stamps: Fifth Avenue Floral, Fundamental Phrases

Ink: Black Stazon, Elegant Eggplant, Old Olive

Paper: watercolor paper, Elegant Eggplant, Whisper White

Accessories: Aquapainter, Dazzling Diamonds, oval punch, scallop oval punch, satin ribbon

Wednesday, September 16, 2009

Sweet Centers Customer Thank You


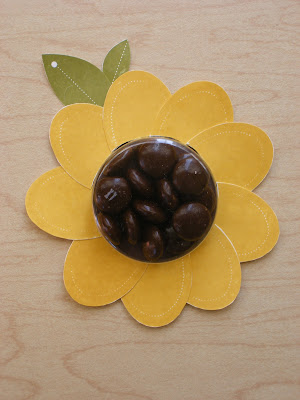
I know I haven't been posting a lot lately but that doesn't mean I haven't been stamping---I just haven't had time to stamp, photograph projects & blog. But I wanted to quickly share a little project I did to thank my customers for their recent orders as well as introduce the Sweet Centers stamp set (available now in the Holiday Mini) to them. I created this project probably a month ago and I've since seen a lot of sunflower projects using this set so we are all thinking along the same lines for this one!! Sweet Centers is a great set if you want to make cards or little treats for various occasions.

I used Crushed Curry for the petals and Old Olive for the leaves. I cut out the petals and leaves (really it didn't take that long. I did it while I was watching TV.) I adhered the petals to the edge of the Sweet Treats cups with SNAIL then attached the leaves so they were peeking out of the side.

For my first trial run of the sunflower I picked out a bunch of brown M&Ms from the giant size bag....really there aren't that many browns in there, I was surprised to discover. And I thought it would take a while to get enough to fill the 10 or so sunflowers I needed to make. Plan B- I got a large tub of chocolate covered raisins and used those to fill the cups instead of M&Ms. Worked out well. I used my good old Coluzzle to cut small circles for the backing, peeled off the paper backing on the treat cups and attached the cardstock backing. I then punched a 13/4" circle in Whisper White and put that on top of the Chocolate Chip backing to write a quick little note thanking my customers.

All in all a pretty cute & quick project.

Stamps: Sweet Centers

Ink: Crushed Curry, Old Olive

Paper: Whisper White, Chocolate Chip (backing of the treat cup)

Accessories: paper snips, sweet treats cups, Coluzzle, 13/4" circle punch

Thursday, September 10, 2009

Polka Dot Cupcake


I favorited an adorable card over on Splitcoaststampers a while ago and wanted to combine it with a card I had done myself earlier in the year. I love the cupcake from the Party Hearty set and lately I've been all about polka dots (as you'll probably see in a future post!). Here is the polka dot card that I got part of my inspiration from and here is my original cupcake card.

While my inspiration card used designer paper for the polka dots I used the awesome Stampin' Up textured cardstock. I held off for a while on buying these papers but I am glad I finally did. The texture just adds enough POP without overwhelming the other elements of the card. It's perfect for adding on in small amounts to keep your project from looking flat. I used my Close to Cocoa marker and did faux stitching around each textured circle. The little ribbon knots are stuck on with glue dots.

I used the 13/4" circle punch and the scallop circle punch to layer my cupcake on. The cupcake was colored with markers, stamped once, cut out. I then inked up the icing again and cut it out, added some dazzling diamonds and then adhered it to the full cupcake with dimensionals. I colored the candle with markers as well and cut it out and adhered it between the 2 icing layers. And a little strip of scallop edge punch finishes it all off.

Stamps: Party Hearty, It's Your Birthday

Ink: Close to Cocoa, Pretty in Pink

Cardstock: Whisper White, Close to Cocoa (regular & textured), Pink Pirouette

Accessories: glue dots, grosgrain ribbon, markers, 3/4" circle punch, scallop edge punch, 13/4" circle punch, scallop circle punch, Dazzling Diamonds, dimensionals